Face it - traditional textbooks are heavy, often out-dated, and often less-than-relevant to your course and teaching style. Why be limited to what your school district buys? After your first year or two, you probably have your own notes & activities that you prefer. Instead of spending precious planning time copying them every year, do what some of your college professors probably did: make your own textbook!
Why Make Your Own?
- Spend less time in the copy room throughout the year.
- Match your text to the way you teach!
- Students won't have to carry so much. A booklet is much lighter than traditional textbooks, plus you can have them hole-punched to fit into a binder.
- Study guides & vocabulary lists can be included with the notes/activities for each unit so students find them easily.
- Help students with organizational difficulties hold onto their papers.
- Supplement your text with new activities as you find them, or tell students to ignore a page or two, so you can stay flexible through the year.
- Images & diagrams show more clearly when professionally printed from a file than photocopied by refurbished machines in the school copy room.
What Would It Look Like?
How Does It Work?
You have probably created & gathered a set of notes or worksheets you like to reuse. Instead of recopying them every year as you go, wasting time in the copy room, organize them into a single file. The formatted template I made for Microsoft Word is below for you to use, if you like. Simply decide how you will organize your year, then copy/paste your material into the file.
|
Here is a template I've made in Microsoft Word you could use. Just edit to fit your needs!
| ||
Personally, I like to make a different book for each semester. This saves time the first year, as you are only planning one semester at a time. Also, if students lose their book, they don't lose the entire year.
Sample Book Organization
Possible Unit Organization
Tips
Sample Book Organization
- Cover page: The first page of the template is set for this purpose. Decorate the front to make it yours!
- Course outline & policies as the first page(s) of the book
- Daily Warm Ups or Calendar section
- Units, in the order you cover them throughout the year [vocabulary lists, notes, activities, study guides, etc.]
- Cumulative Study Guide (for midterm or final, if you have them)
Possible Unit Organization
- Unit outline
- Vocabulary for unit (preferably with a link to one you've setup in Quizlet, as I did here)
- Notes & activities for the unit, in the order you typically complete them
- Study guide
Tips
- Scan in paper documents, then paste them into the file.
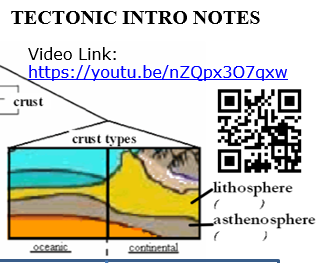
- If you have videos, websites or other online material, include a QR-code near the link in the book, so students can easily access it. Make sure the link text is easy to read, preferably not underlined (that hides symbols like _ ) and that neither they nor the QR code will be cut off by the hole-punch.
- Have the book three-hole-punched, so students can put it in their binders.
- Pick a bright color for the cover, so it's clearly visible in their book bags.
- Make a version with all the notes filled in, but the worksheets blank, to give to students whose IEP requires completed copies of notes.
- Make another version with EVERYTHING answered, to give to team teachers, aides, or long-term subs.
- Keep the font large & images clearly visible.
- Submit the book electronically if possible. That'll keep the images sharper.
- Colored ink copying really adds to the cost - stick to black & white unless you feel it's absolutely necessary.
- Save at least one copy for yourself. This one you will make corrections & notes in throughout the year. Use it to improve your book next year.
- Consider getting together with colleagues who teach the same course at your school or district. You may be able to work together to make a book with all your best sheets & activities. Pool your submissions, divide them up by unit, and each of you can work on different units to split the work. If you make it in GoogleDrive or OneDrive, you can all work on the same document simultaneously.
- After sending off your book, create a new file for the next year and make updates as the ideas strike you. Inevitably, you'll think of things as soon as it's too late to change!
- Don't feel trapped by the book, edit whenever necessary. Fix mistakes when you find them (in your own paper copy, or in your 'next year' file). If you find a new activity, or decide to skip one that's in the book, feel free to. Just decide if you want to make the correction for next year.
Our district has a copy center, where we can submit such items to be printed, heat-bound & ready before school starts. If your district doesn't have a central printing center, you can take your file to a copy service and most school districts will reimburse you. Just make sure to have enough printed for your usual class sizes, plus extras for students who change classes throughout the year. I fix my fall semester book in June & submit it in late June/early July. The spring semester book I fix & send for copying in November/early December.
